Difference between revisions of "NED data in GridFloat format"
(→Step 2) |
(→Downloading) |
||
| (18 intermediate revisions by one user not shown) | |||
| Line 3: | Line 3: | ||
== Downloading == | == Downloading == | ||
| + | |||
The files are named by the North West corner having the following syntax: | The files are named by the North West corner having the following syntax: | ||
NXXWYYY.zip | NXXWYYY.zip | ||
| − | where XX = the | + | where XX = the latitude in degrees and YYY = longitude in degrees |
The files are available in two resolutions: | The files are available in two resolutions: | ||
| − | 1" GridFloat files (covers North America) | + | * 1" GridFloat files (covers North America) |
| − | + | * 1/3" GridFloat files (covers the USA): | |
| − | + | You can use the download tool to access these files: | |
| − | + | [[FetchSRTM]] - Download tool for finding and downloading SRTM and NED terrain data. | |
==Using with Pathloss 5== | ==Using with Pathloss 5== | ||
| Line 52: | Line 53: | ||
===Step 2=== | ===Step 2=== | ||
| − | Start Pathloss 5 and click Configure - Set GIS configuration | + | Start Pathloss 5 and click '''''Configure - Set GIS configuration''''' |
| + | |||
| + | [[File:GIS-NED-1.png|center]] | ||
| + | |||
| + | |||
| + | Select the '''''Primary DEM''''' tab, set the '''''Digital elevation model''''' to '''''GridFloat (NAD83)''''', and click '''''File index''''' | ||
| + | |||
| + | |||
| + | [[File:GIS-NED-2.png|center]] | ||
| + | |||
| + | |||
| + | In the Index click '''''Files - Import index - Create for folder-subfolders''''' | ||
| + | |||
| + | |||
| + | [[File:GIS-NED-3.png|center]] | ||
| + | |||
| + | |||
| + | Select the directory, in this case it is NED_1_GRIDFLOAT. Also set the '''''Files of type''''' to '''''grid float - new''''' and click '''''OK''''' | ||
| + | |||
| + | |||
| + | [[File:GIS-NED-4.png|center]] | ||
| + | |||
| + | |||
| + | Once you click '''''OK''''' the program will scan for GridFloat files in this directory and all sub-directories and index all of them. You should now see the files in your index. They are ready to use. Click '''''Files - Close''''' or the red X in the upper right corner to exit the index. Once back in the '''''Configure geographic system''''' dialog box, click '''''OK''''', you will be prompted to save your changes. | ||
| + | |||
| + | ==Using with Pathloss 4== | ||
| + | To set up the NED files wiht Pathloss 4, first follow [[NED_data_in_GridFloat_format#Step_1|Step 1]] from the Pathloss 5 setup and then: | ||
| + | |||
| + | Start Pathloss 4 and click '''''Configure - Terrain Database''''' | ||
| + | |||
| + | In the '''''Primary''''' dropdown list, select '''''GRIDFLOAT - Conus''''' and then click '''''Setup Primary''''' to enter the index | ||
| + | |||
| + | |||
| + | [[File:GIS-NED-5.png|center]] | ||
| + | |||
| + | |||
| + | Click '''''Index - Create for folder subfolders''''' | ||
| + | |||
| + | |||
| + | [[File:GIS-NED-6.png|center]] | ||
| + | |||
| + | |||
| + | Select the directory from [[NED_data_in_GridFloat_format#Step_1|Step 1]] and click '''''OK''''' | ||
| + | |||
| + | |||
| + | |||
| + | [[File:GIS-NED-7.png|center]] | ||
| + | |||
| + | |||
| − | + | Once you click '''''OK''''' the program will scan for GridFloat files in this directory and all sub-directories and index all of them. You should now see the files in your index. They are ready to use. Click '''''Index - Close''''' or the red X in the upper right corner to exit the index. Once back in the '''''Configure Terrain Database''''' dialog box, click '''''OK'''''. | |
Latest revision as of 13:02, 30 July 2021
This is the same NED data except in Grid float format. These files are twice as big as the BIL format. They will run a bit slower for generating network backgrounds.
Contents |
Downloading
The files are named by the North West corner having the following syntax:
 NXXWYYY.zip

 where XX = the latitude in degrees and YYY = longitude in degrees
The files are available in two resolutions:
- 1" GridFloat files (covers North America)
- 1/3" GridFloat files (covers the USA):
You can use the download tool to access these files:
FetchSRTM - Download tool for finding and downloading SRTM and NED terrain data.
Using with Pathloss 5
Once the files have been downloaded use the following procedure to set up with Pathloss 5
Step 1
Unzip the files to a common directory, in this case we will make a directory called NED_1_GRIDFLOAT. Each ZIP file will contain 22 files, a FLT file and 21 supplemental files. When unzipping multiple archives to the common directory, you may be prompted to overwrite some existing files, this is normal and you should select yes. Do not modify or delete any of the other files.
Once unzipped you should have a directory tree similar to the following:
NED_1_GRIDFLOAT
 |
 |-floatn45w101_1.flt
 |-floatn45w101_1.hdr
 |-floatn45w101_1.prj
 |-floatn45w101_1_thumb.jpg
 |-n45w101_1_meta.dbf
 |-n45w101_1_meta.html
 |-n45w101_1_meta.prj
 |-n45w101_1_meta.sbn
 |-n45w101_1_meta.sbx
 |-n45w101_1_meta.shp
 |-n45w101_1_meta.shp.xml
 |-n45w101_1_meta.shx
 |-n45w101_1_meta.txt
 |-n45w101_1_meta.xml
 |-ned_1arcsec_g.dbf
 |-ned_1arcsec_g.prj
 |-ned_1arcsec_g.sbn
 |-ned_1arcsec_g.sbx
 |-ned_1arcsec_g.shp
 |-ned_1arcsec_g.shx
 |-NED_DataDictionary.url
 |-readme.pdf
Step 2
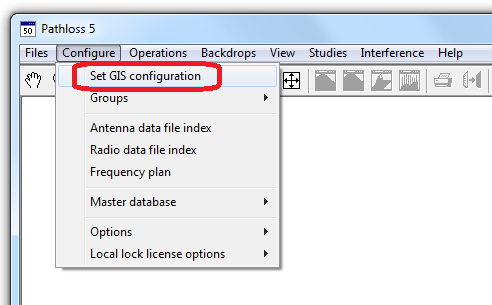
Start Pathloss 5 and click Configure - Set GIS configuration
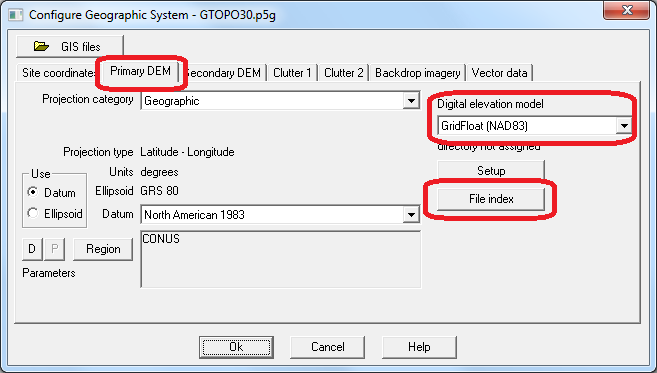
Select the Primary DEM tab, set the Digital elevation model to GridFloat (NAD83), and click File index
In the Index click Files - Import index - Create for folder-subfolders
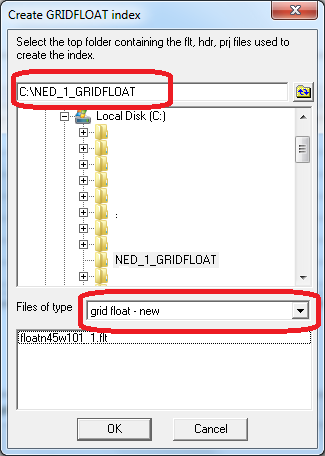
Select the directory, in this case it is NED_1_GRIDFLOAT. Also set the Files of type to grid float - new and click OK
Once you click OK the program will scan for GridFloat files in this directory and all sub-directories and index all of them. You should now see the files in your index. They are ready to use. Click Files - Close or the red X in the upper right corner to exit the index. Once back in the Configure geographic system dialog box, click OK, you will be prompted to save your changes.
Using with Pathloss 4
To set up the NED files wiht Pathloss 4, first follow Step 1 from the Pathloss 5 setup and then:
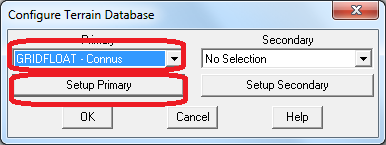
Start Pathloss 4 and click Configure - Terrain Database
In the Primary dropdown list, select GRIDFLOAT - Conus and then click Setup Primary to enter the index
Click Index - Create for folder subfolders
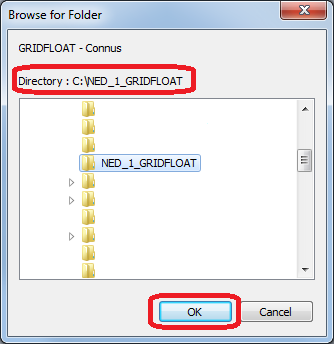
Select the directory from Step 1 and click OK
Once you click OK the program will scan for GridFloat files in this directory and all sub-directories and index all of them. You should now see the files in your index. They are ready to use. Click Index - Close or the red X in the upper right corner to exit the index. Once back in the Configure Terrain Database dialog box, click OK.
